CLICK HERE FOR FREE BLOGGER TEMPLATES, LINK BUTTONS AND MORE! »

Saturday, July 17, 2010

Another Class!


Join me in creating this super summery mini album using an adorable little canvas binder from Maya Road along with October Afternoon's "Fly A Kite" paper collection. In this fun class you will actually hand sew and stuff this cute little bird onto your album's canvas cover! Inside your book is 8 chipboard pages that hold 8 photos, plus 2 cute little canvas pockets to hold special memorbilia. Also included in the class kit is an entire Mini Market alphabet sticker set to customize your book with your special event or liking.

Call the store today to reserve your spot!

Where: The Scrapbook Garden, 714-841-1801
When: Saturday, August 14th from 2:00 to 6:00 pm''

In addition to your basic tool kit, you will need to bring the following supplies:

•Cat's Eye Creamy Brown chalk ink or equivalent (SEI=Capuccino, Tsukeniko=Sahara Sand)
•Foam tape, dots or squares
•Crop-a-dile
•Corner rounder
•Heavy duty emery board for sanding
•Liquid fabric glue (Fabri-Tac, Helmar's, Beacon's, etc.)

See you there!!


Monday, May 10, 2010

Finally...A New Class!


HEY LOCALS!!
What are you doing on Saturday, May 22nd at ohhh....say around 2:00pm? Why not join me in creating this cheerful mini book using the Pinecone Press Flap Book album and the adorable Jack and Jill line from My Mind's Eye at the Scrapbook Garden? This mini book has 6 tri-fold pages and spots for over 15 of your favorite springtime photos! Use the title "So Tweet" like the sample, or create your own title using the Creative Imaginations glitter-foam alphabet included in your kit. As always we will enjoy great company, snacks and prizes!
Call Melissa @ (714) 841-1801 to reserve your spot today...before the class sells out!
And be sure to include a stapler and plenty of foam tape in your tool kit :)

Friday, May 7, 2010

SD4U May Kit: Thrift Shop!

October Afternoon is arguably my favorite paper manufacturer...and the Thrift Shop line in the May Kit has got to be my all time favorite collection from them! Something about the this particular color combination mixed with cream and black along with the nostalgic patterns and accents just really grabs me!

Once I got started on my layouts, I really had to force myself to stop at night! One idea kept leading to another, and I was able to finish 4 layouts and a card this week alone:


Play: This layout features that super cute nephew of mine, and was the first layout I finished. I think I subconsciously went with this patchwork design because I wanted to use ALL of the paper, and as LITTLE of the paper as possible at the same time...LOL. I try not to, but I can certainly be as guily of hoarding beautiful paper as the next guy! I cut this title using the Cricut and Simply Sweet Cart...love this font!


Before She Was Mom: This nostalgic paper line was screaming for me to use some older, black and white photos, and this was the result. I cut the "collectors item" pattern into this scalloped border for the top and bottom, and I love how it ended up looking just like old fashioned lace. Note: I will be posting a tutorial of the fabric flower for this layout in the class/tutorial forum over the weekend!


Celebrate: Some of you will recognize my good friend Alice here celebrating her birthday with her favortie people...Minnie Mouse and Pluto. I kept this layout pretty simple, since the photos have a lot going on in them. And I just noticed, I forgot to add the date in my journaling circle...'doh! Gotta remember to go do that right away...


Still My Baby: I think this is my favorite of the bunch. The more colorful patterns just POP right off the black and cream paper background. For a little extra femininity, I accented the flower stickers with some red glitter and rhinestones and pearls....then staggered the cluster dimensionally with pop dots. And all you moms out there will agree...no matter how old they get, they're always your babies...right? My "Baby" turned 23 this year!


And here's something I threw together with my scraps...because you KNOW that paper is just too cute to throw even the smallest scrap away:It's just a little 4"x4" note card that took just a minute to throw together. Aren't those OA letter stickers ADORABLE? They're just like the little MM ones, only bigger, and I LOVE them...they are the perfect size...not to small and not too big. Perfect for sub-titles and card sentiments.

Thanks for taking a peek at my projects, and if you've decided you NEED one of these delightful kits for your own, pop on over to SD4U and order yours quick, before they're all gone! You won't be disappointed!

Thursday, April 15, 2010


It's that time again...Reflections is just around the corner, and I'm so excited to announce that I will be representing the Scrapbook Garden at their Isle Carnivale Make & Take event at the Hyatt Regency in Newport beach on Friday, April 30th!

For those of you that aren't familiar, Reflections is a top-notch scrapbooking retreat that offers tons of classes taught by the industry's most talented designers. The Isle Carnivale Make & Take night however, along with a vendor faire, is open to the public as was as registered attendees of the retreat.

Here's a little peek at what we'll make:
It's a one page birthday layout featuring the latest and greatest from Creative Imaginations! To see the whole thing....or better yet make one of your own...you'll have to stop by my booth between 7:00 and 10:00 and say hello!
For more information on this awesome retreat and all it's exciting events, contact Scrapbook Oasis at (949) 756-2729 or visit the website by clicking the link above. I hope you can make it, it's going to be such fun!

Monday, April 12, 2010

SD4U April Kit: April Showers

This "Quite Contrary" line from My Mind's Eye was the line I saw at CHA winter that really, really struck me and let me tell you, I was beyond excited that when I found out I would be designing with it this month! I mean seriously, is there a paper line that screams my name any louder? I don't think so! If you know me at all, you know I love me some bright, bright colors! And of course, pair the above mentioned paper line with an entire jar of matching Prima flowers, some blingy-bling and matching ribbon, and you KNOW I'm in heaven!


Here's what was inspired by this fabulous kit:


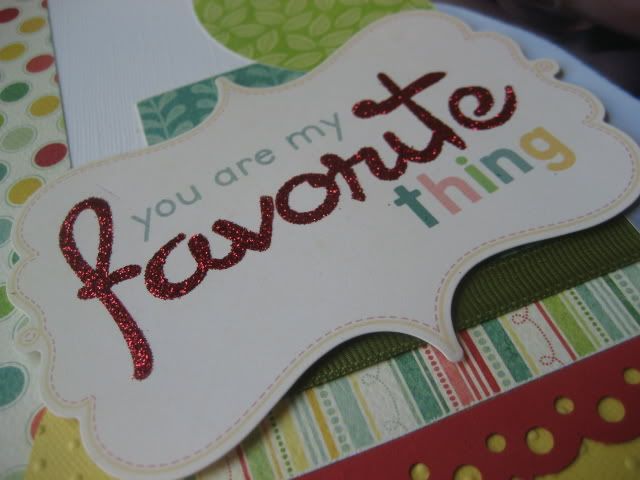
My Favorite Thing: Of course that would be my little nephew Clayton! I built this layout on a sheet of white cardstock from my stash...and for a little extra fun, I filled in the letters of the word "favorite" from the cardstock title block with quickie glue and sprinkled on some red glitter. I even busted out the "swiss dots" cuttlebug folder for the yellow circle here...it added just the right touch to an otherwise boring cardstock circle :)


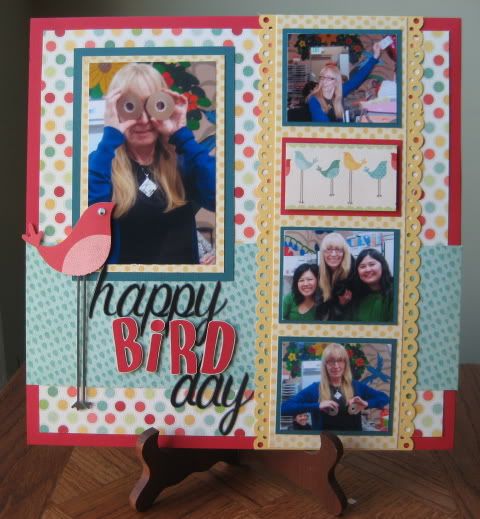
Happy Bird Day: My Friend Patty is such a nut...'nuff said about that! Here, I used my new Martha Stewart punch for the first time on the vertical yellow cardstock strip, and I just LOVE it...isn't it fun? I also couldn't resist adding a little "googly" eye from my stash onto the cardstock bird in the kit...it just totally added a little character!


Life Is Good: I just love the title blocks that come with this kit...it's nice to have a title premade for a change...it frees up time to do other stuff, like layer flowers and make ribbon leaves! The flower centers here are from my stash...I'm not exaggerating when I say I think I've had these corduroy brads for at least 6 or 7 years!


Hello Card: Putting that cuttlebug to good use again! And I just love the little stamp set that came in the kit! For my sentiment here, I stamped the little bracket shape onto white cardstock, stamped my sentiment inside and mounted it to the front of the card with foam tape after trimming it...simple and adorable!


In other news, I'm working on something pretty exciting and should be able to share with you very soon! Stay tuned...


Saturday, March 27, 2010

Happy Bee Day


Join me in wishing my dear friend Patty a Happy Belated Birthday, won't you? She's the bee's knees, for sure :)

Saturday, March 13, 2010

Sing it with me...

Everybody's liiii-ving in a material world, and I am a material girl....mateeeriaaa-uuhl!

Well, I am this month at least, because I've been working with SD4U' "Material Girl" March kit featuring Cosmo Cricut's whimsical, bright, sewing-inspired line. Check this beauty out:


Martha's done it again...another fantastic, stuffed-to-the-brim, perfectly coordinated kit filled with the latest and the greatest everything! Here's what I've been up to with it:

Sweet: I was so excited to see a whole bottle of gorgeous coral colored Shimmerz in my kit and busted it out first thing! For the background on this layout I used the lace paper in the kit as a mask and sprayed my Shimmerz over it onto the background cardstock to create a subtle pattern on the left side of the page...I totally love this understated effect, and it was so simple!

She's Crafty: There's that song title obsession thing again...I just can't help myself! These photos are of my most favorite scrappy goodies, and what fun it was to do a layout about them. You can see a step-by-step tutorial of how I put this layout together on the SD4U Message Board in the Class/Tutorial Forum.

Sew...How've You Been?: Just a quick little card I put together for a challenge over on the message board...are you up for it? The challenge is to simply alter any pre-made alphabet. Here I inked my cream colored foam Thickers with a coral chalk ink, then added Diamond Stickles and totally changed the whole look of my alphabet stickers.


Sew Adorable: Nope, I just couldn't resist the play on words for my title! These photos are of my daughter Ashley when she was about 4 years old (almost 19 years ago!!!) Aren't all those little chipboard sewing embellies so much fun? That chipboard needle and thread just kill me! I added a little detail to mine with my Stardust gel pen, and the silver just shimmers in real life!


Cute as a Button: On this layout, I strung all the chipboard buttons together from my kit, then attached them using foam tape to create this fun little border. I also sprayed the title letters with my coral Shimmerz...and although I worried at first that the color wouldn't stick to the foam texture...it did eventually dry and work like a charm.


Thanks for popping by! And if you find yourself home and looking fora little inspiration and motivation next weekend, why not join us over at SD4U for our 2nd Annual Birthday Party Crop? As always, there will be lots of challenges, games and plenty of prizes to be won! Hope to see you there!!